Tutorial 2 - Adding a frontend
You'll add a Vue 3 frontend to the hello-mint plugin from Tutorial 1. The current scaffold uses @morscherlab/mint-sdk, PluginWorkspaceView, Vite, and a generated typed client in frontend/src/generated/mint-plugin.ts.
Time: ~45 minutes Prereqs: Tutorial 1 completed; Bun installed
1. Add the scaffold
mint init includes a frontend by default. If you are starting a new plugin, omit --no-frontend:
mint init hello-mint \
  --name "Hello MINT" \
  --description "Hello world analysis plugin" \
  --type analysis \
  --template analysis-basic \
  --yes
If you already followed Tutorial 1 and created a backend-only plugin, create a temporary frontend-enabled scaffold and copy its frontend/ directory into your existing plugin:
mint init /tmp/hello-mint-with-frontend \
  --name "Hello MINT" \
  --description "Hello world analysis plugin" \
  --type analysis \
  --template analysis-basic \
  --no-install \
  --no-git \
  --yes

cp -R /tmp/hello-mint-with-frontend/frontend ./frontend
mint sdk generate
cd frontend
bun install
cd ..
Because Tutorial 1 created a backend-only package, also add the frontend asset include block to pyproject.toml:
[tool.hatch.build.targets.wheel.force-include]
"frontend/dist" = "mint_plugin_hello_mint/frontend"
Fresh plugins scaffolded with the frontend already have this block. Without it, mint build may warn that frontend/dist is not included in the wheel.
After mint sdk generate, the project has:
hello-mint/
├── frontend/
│   ├── package.json
│   ├── vite.config.ts
│   ├── postcss.config.js
│   └── src/
│       ├── App.vue
│       ├── main.ts
│       ├── style.css
│       ├── generated/
│       │   ├── mint-plugin.contract.json
│       │   └── mint-plugin.ts
│       └── views/
│           ├── DashboardView.vue
│           └── AnalysisView.vue
└── src/mint_plugin_hello_mint/
Checkpoint:
mint sdk generate --checkIf this reports drift, run mint sdk generate again. The generated client must match the backend routes and Pydantic schemas.
2. Inspect the generated app shell
The scaffold installs the SDK plugin before Pinia and Vue Router:
// frontend/src/main.ts
import { createApp } from 'vue'
import { createPinia } from 'pinia'
import { createRouter, createWebHistory } from 'vue-router'
import { MINTSdk } from '@morscherlab/mint-sdk'

import './style.css'
import App from './App.vue'

const routes = [
  { path: '/', name: 'dashboard', component: () => import('./views/DashboardView.vue') },
  { path: '/analysis', name: 'analysis', component: () => import('./views/AnalysisView.vue') },
]

const router = createRouter({
  history: createWebHistory(import.meta.env.BASE_URL),
  routes,
})

createApp(App).use(MINTSdk).use(createPinia()).use(router).mount('#app')
App.vue wraps routes in the standard plugin workspace:
<!-- frontend/src/App.vue -->
<script setup lang="ts">
import { computed } from 'vue'
import { useRoute } from 'vue-router'
import { AppContainer, PluginWorkspaceView } from '@morscherlab/mint-sdk'
import { pluginPageSelectorItems } from './generated/mint-plugin'

const route = useRoute()

function normalizeNavPath(path: string): string {
  const raw = path.trim() || '/'
  const prefixed = raw.startsWith('/') ? raw : `/${raw}`
  return prefixed.replace(/\/+$/, '') || '/'
}

function pageId(path: string): string {
  const normalized = normalizeNavPath(path)
  return normalized === '/' ? 'dashboard' : normalized.replace(/^\/+/, '').replace(/\/+/g, '-') || 'dashboard'
}

const pageSelector = pluginPageSelectorItems
const visiblePageSelector = computed(() => pageSelector.length > 1 ? pageSelector : undefined)

const currentPageSelectorId = computed(() => {
  const path = normalizeNavPath(route.path)
  return pageSelector.find(p => p.to === path)?.id ?? pageSelector[0]?.id ?? pageId(path)
})

const currentPageTitle = computed(() => {
  return pageSelector.find(p => p.id === currentPageSelectorId.value)?.label ?? 'Dashboard'
})
</script>

<template>
  <PluginWorkspaceView
    title="Hello MINT"
    :subtitle="currentPageTitle"
    :page-selector="visiblePageSelector"
    :current-page-selector-id="currentPageSelectorId"
    show-theme-toggle
    show-settings
    :show-standalone-label="false"
    :show-sidebar="false"
  >
    <AppContainer scrollable>
      <router-view />
    </AppContainer>
  </PluginWorkspaceView>
</template>
The CSS entry is intentionally small:
/* frontend/src/style.css */
@import "tailwindcss";
@import "@morscherlab/mint-sdk/styles" layer(mint-sdk);
3. Use the generated client
After Tutorial 1's backend changes, run:
mint sdk generateThe generated client exposes the backend route plus contract metadata:
// frontend/src/generated/mint-plugin.ts
export type GeneratedPluginClient = {
  health: () => Promise<unknown>
  analyze: (params: {
    pathParams?: { experimentId?: number }
    body: AnalyzeRequest
  }) => Promise<AnalyzeResponse>
}

export const pluginPageSelectorItems = getPluginPageSelectorItems(pluginContract)
export const generatedPluginEndpoints = ['health', 'analyze'] as const

declare function useGeneratedPluginClient(): GeneratedPluginClient
declare function useGeneratedPluginContract(): unknown
declare function buildGeneratedPluginEndpointUrl(
  name: 'health' | 'analyze',
  payload?: unknown,
): string
Endpoint calls use a structured payload when a route has path/query params and a body:
await pluginClient.analyze({
  pathParams: { experimentId: 1 },
  body: { parameters: { threshold: '0.5' } },
})
The same generated file also exports endpoint definitions, URL builders, upload/download helpers, event-stream helpers, settings helpers when your backend declares settings_model, and pluginContractHash for diagnostics.
Do not edit frontend/src/generated/* by hand. Regenerate it whenever backend routes, PluginMetadata.nav_items, settings models, or response schemas change. If fields you just added to a Pydantic model do not appear in AnalyzeResponse, you are probably running an older mint-sdk; update the SDK and run mint sdk generate again.
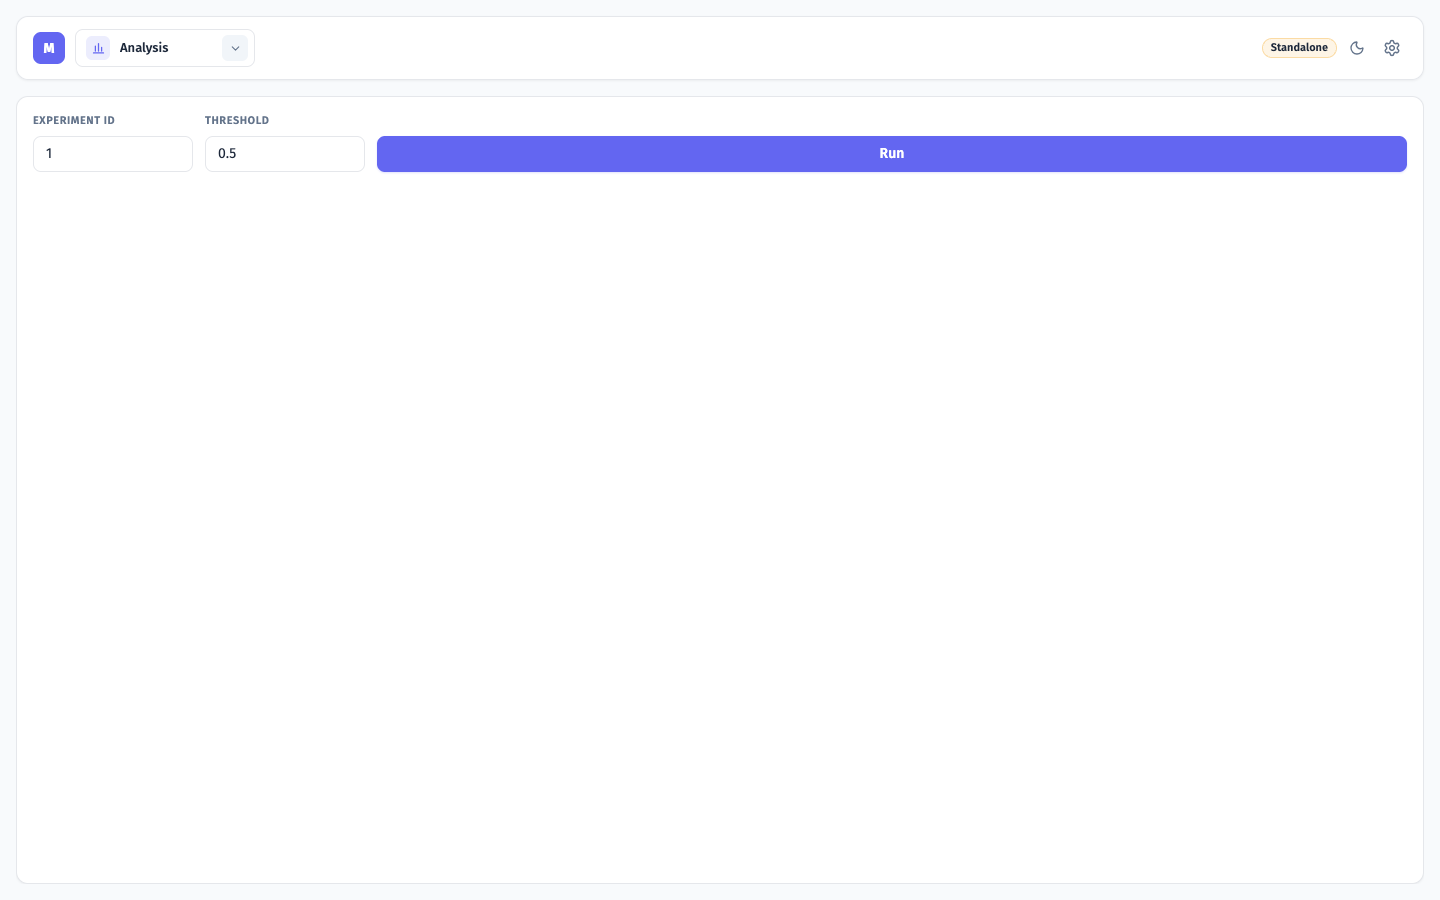
4. Replace the analysis view
Replace the generated placeholder view with a small form that calls /api/hello-mint/analyze/{experiment_id} through the typed client:
<!-- frontend/src/views/AnalysisView.vue -->
<script setup lang="ts">
import { ref } from 'vue'
import {
  AlertBox,
  BaseButton,
  BaseInput,
  FormField,
  Skeleton,
  useRequestSyncState,
} from '@morscherlab/mint-sdk'
import { useGeneratedPluginClient, type AnalyzeResponse } from '../generated/mint-plugin'

const pluginClient = useGeneratedPluginClient()
const request = useRequestSyncState('Analysis request failed')

const experimentId = ref(1)
const threshold = ref('0.5')
const result = ref<AnalyzeResponse | null>(null)

async function runAnalysis() {
  result.value = null
  await request.run(async () => {
    const response = await pluginClient.analyze({
      pathParams: { experimentId: experimentId.value },
      body: { parameters: { threshold: threshold.value } },
    })
    result.value = response
    return response
  }).catch(() => undefined)
}
</script>

<template>
  <div class="flex flex-col gap-4">
    <div class="grid gap-3 sm:grid-cols-[160px_160px_auto] sm:items-end">
      <FormField label="Experiment ID">
        <BaseInput
          v-model.number="experimentId"
          type="number"
          :min="1"
        />
      </FormField>
      <FormField label="Threshold">
        <BaseInput v-model="threshold" />
      </FormField>
      <BaseButton :loading="request.loading.value" @click="runAnalysis">
        Run
      </BaseButton>
    </div>

    <Skeleton v-if="request.loading.value" variant="rounded" height="72px" />

    <AlertBox v-else-if="request.error.value" type="error">
      {{ request.error.value }}
    </AlertBox>

    <AlertBox
      v-else-if="result"
      :type="result.status === 'ok' ? 'success' : 'info'"
    >
      {{ result.status }} - {{ result.experiment_name ?? 'standalone mode' }}
      ({{ result.parameter_count ?? 0 }} parameter)
    </AlertBox>
  </div>
</template>
This page works in both modes:
mint devreturns the standalone fallback from Tutorial 1.mint dev --platformlets you open the plugin through the platform route, but the plugin backend is still the standalone dev server. Install the plugin in MINT to exercise the fullPlatformContextpath.
5. Run the frontend
From the plugin root:
mint devDefault ports:
Backend   http://127.0.0.1:8003/api/hello-mint
Frontend  http://localhost:5175
Open:
http://localhost:5175/hello-mint/analysisThe Vite dev server proxies /api to the backend on 8003, so the frontend can call the plugin API without hard-coding a host.
6. Run through the platform dev proxy
From the plugin root:
mint dev --platformDefault routing:
Platform backend   http://localhost:8001
Plugin backend     http://127.0.0.1:8003/api/hello-mint
Plugin frontend    http://localhost:5175
Proxy              /hello-mint -> http://localhost:8003
Open the platform and navigate to the plugin route:
http://localhost:8001/hello-mint/analysisThis is useful for checking platform routing, navigation metadata, and auth header forwarding. It is not the same as an installed plugin with a full PlatformContext.
7. Build for production
cd frontend
bun run build
cd ..
mint build
mint build detects frontend/dist/ and includes it in the plugin wheel through the tool.hatch.build.targets.wheel.force-include block in pyproject.toml.
Next
- Component Library - choose SDK UI pieces before writing custom Vue
- Frontend → Composables - platform-aware state and API helpers
- Operations → Packaging - how frontend assets enter the
.mintbundle